Friday, June 27, 2014

Feathered Friday: Growing Up Chicks

Sorry this is getting out late.  It's hard coming back from vacation and getting back into the routine. . . of sorts.  

We were gone for a week, and when we left the Littles were still pretty little.  The first batch of Littles--James-the Light Brahma Rooster, Rocky-the Barred Rock, and Pumpkin, Buffy, and Toot-the three Buff Orpingtons--were already mostly feathered in.  But the Little Littles--the three Black Australorps--were still pretty fluffy.

The picture below was taken a week before we left, when the Big Littles were 32 days old, and the Little Littles were 12 days old.
You see how the Australorps were still balls of fluff for the most part.  And the bigger chicks look like awkward teenagers.

The next shots were taken two weeks later, after we returned from our vacation.  
Toot, Buffy, Rocky, & Pumpkin
and an Australorp on top of the waterer.
Our roo, James
and an Australorp


Our roo, James
and an Australorp


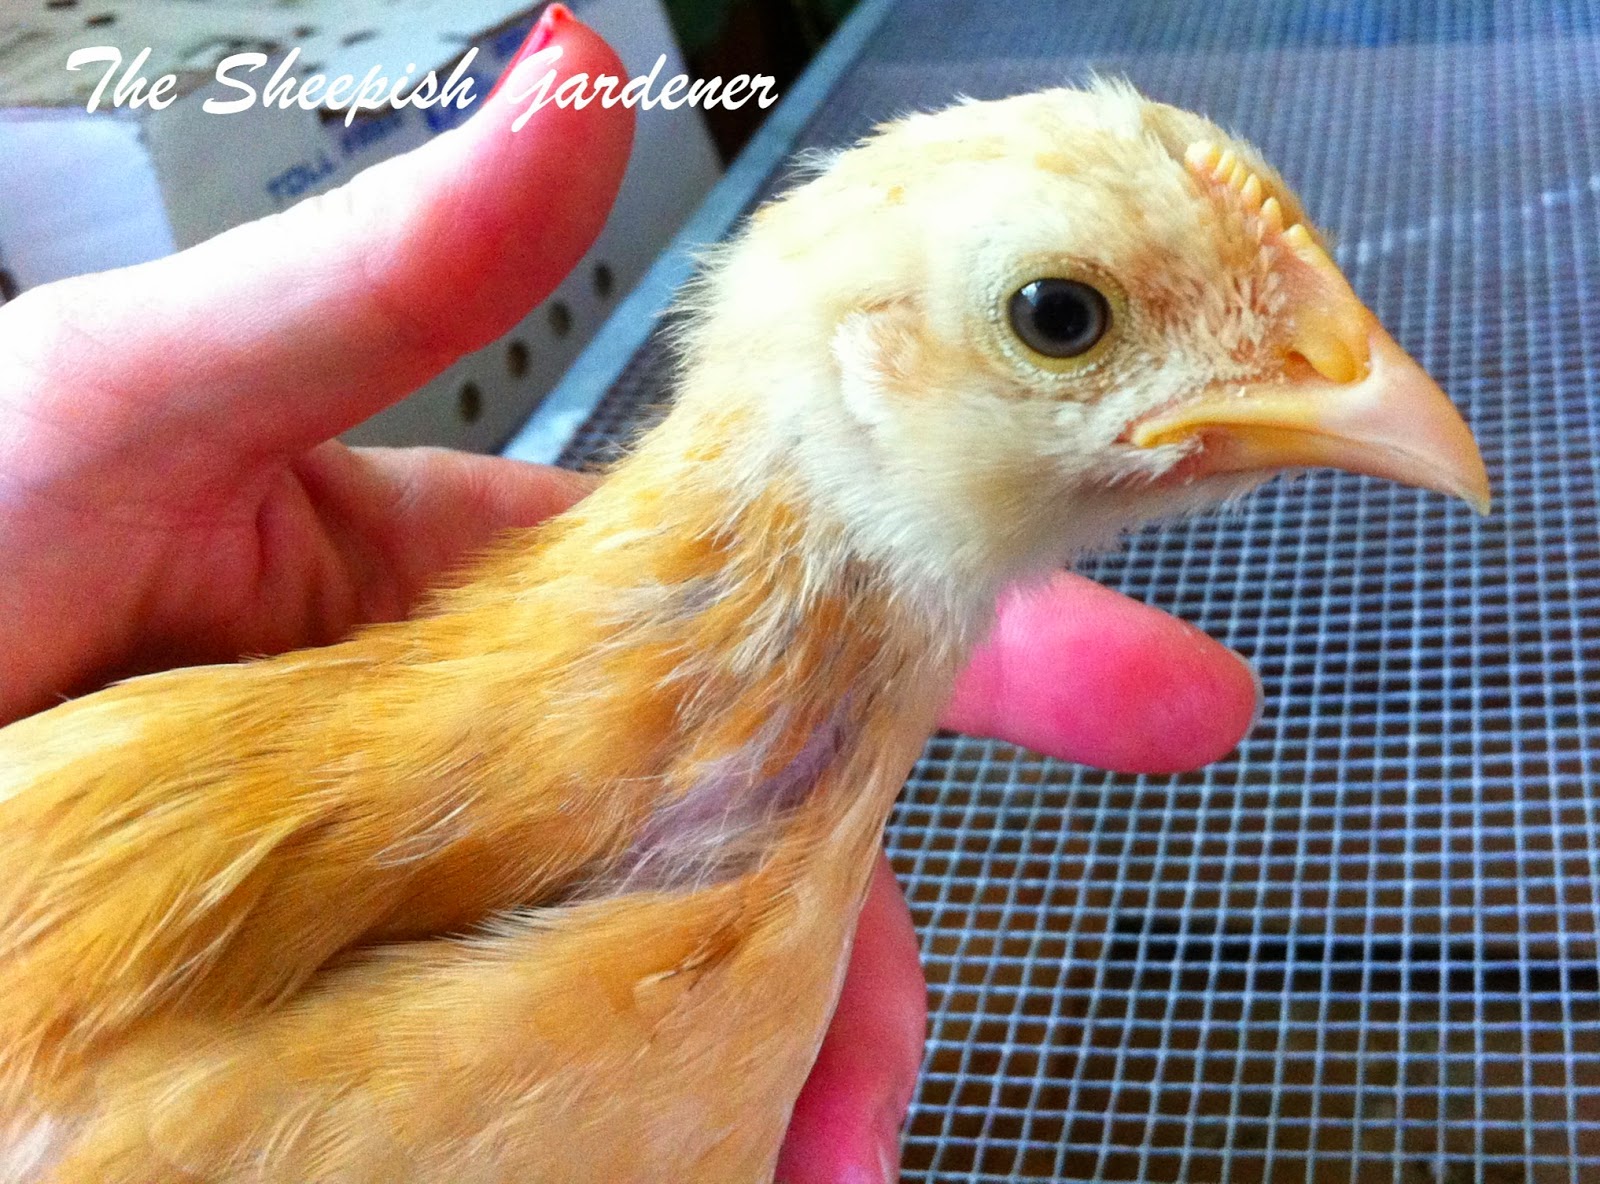
At 38 and 28 days respectively, you can see how much they've grown in the two-week span between these photos.  The Big Littles are all fully feathered now, and the Australorps are quickly approaching that status.  It was a shock to come home to these dramatic changes.  

The most startling change, though, was the appearance of a pronounced crest and wattle on one of the bigger Australorps.  Especially when compared to the other of the same size.  (The third Australorp may be a day or so younger than the others because she is smaller and less feathered.  I call her Tiny.)


I will definitely keep you posted on the progression of this possible rooster.  But remember, I won't really know until the crow.  


Chicken Love!

Wednesday, June 25, 2014

Catchin' Caterpillars

Hello readers!  I know I was gone for a long week that spanned four (!) entries, but I needed the time off.  Being a stay-at-home-mom has stresses I never encountered in my working days, and sometimes they are much worse for the fact that there is no escape.  But I'm not going into that, so my lips are zipped.

When I checked on my herbs after a week of being gone, I found three caterpillars on my dill.  Now, I know from last year that these particular caterpillars are those of the Black Swallowtail butterfly, they have three or four distinct growth points before the chrysalis stage, they eat a LOT, and. . . . it is fascinating to watch this entire process.

These caterpillars eat plants from the parsley family, which can include curly and Italian flat leaf parsley, carrot, celery, dill, and Queen Anne's Lace.  Some sources also include Rue in the list.

I say three or four growth points because the caterpillars start as small little things that look like a bird dropping. . . 
1st caterpillar stage
And grow into fat lengths of black-striped green. . .
Final caterpillar stage
But in between, the caterpillar changes.  I have seen them shed their skin (and eat it) from the bird-poo stage into another bird-poo stage that is just bigger with a bit more orange or yellow.  But I have also seen them go directly into a black-and-yellow or black-and-orange striped caterpillar that still has its baby spikes (as the top caterpillar in the photo below).
3 stages
As they grow, the spikes get smaller until they are completely gone, and the caterpillar is left looking smooth.

They eat a lot when they're smaller, but boy do they chow down when they get to the final stage before becoming a chrysalis.  They have to eat like a bear in order to pack in calories to fatten up for the great transformation.  

Once they are done munching, it's on to the chrysalis phase.  (Next week I shall post about this fascinating process, but I'm still looking for the video I took.)

Until then, check your herbs for a very cool science project for your kids. 

Happy caterpillar hunting!

                 Glorious-Butterfly.com

Friday, June 13, 2014

Feathered Friday: Boo-boo Lays an Egg

This Wednesday I cleaned out Boo-boo's coop.  At first, she hung out on top of the nesting boxes while I forked dirty straw and shavings in to the wheel barrow.  But when I broke out the shovel and the dust started getting a little crazy, I put out the pop door.  And there she stood, undecided as to whether to go out to the run or come back in to see what the heck I was doing to her home.

At one point she did come back in and flew up to the nesting boxes.  The boxes were empty, so she went in each one and turned around, making her little hen noises at me.  Being as inept as I am with foreign languages, I am the furthest thing from an expert in chicken talk.  I think I understand when she is happy with me, or saying hello, or other such pleasantries, but this time she was definitely yelling at me.  Or, at least expressing her displeasure with what I was doing.

Then it occurred to me:  She wants to lay her egg now.  This realization sparked both elated curiosity with the desire to learn and a slight annoyance that she would want to do the deed while I was cleaning out the coop.  So I hurried as much as I could through the dust storm.

Once the coop had a nice layer of straw (it's all I had), and the boxes were fluffed. . .


Fresh coop
Fresh coop


. . . Boo-boo made quick work of settling into one.  


Boo-boo in her chosen box.


So I was right.  She wanted to lay her almost-daily egg.  Even after she settled in, she was very busy picking at the straw.  It was fascinating, really.  If I had had the time, I would've sat there and watched the process, taking pictures the whole way through.  Then I would be closer to understanding parts about chicken raising that intrigue me but remain out of reach.  Reading only gets me so far.  The science lover in me--and more specifically, the part that needs to understand animal behavior--needs to see things for itself.  (Myself?  Boy that sounds awkward, there.)

That night, there was a beautiful egg waiting for me in the box Boo-boo had chosen.  She is a good chicken.  I have really grown to love her. 


Chicken love!

I will be taking a hiatus next week to spend time with my boys.  I apologize for the lapse, but I didn't have time to get posts done ahead of time.  See you on the 23rd!

Wednesday, June 11, 2014

The Waiting Continues. . .

. . . But plans are in place to redistribute the plantings this year.  

The crop will be a little later than anticipated, but thanks to my strawberries arriving in a plastic bag and covered in mold, I will be utilizing that plot for my tomatoes.  The cucumbers and winter squash will be moved into pots.  Hopefully with some sort of trellis to hang onto.  

At this point I am also unsure of the raspberries.  I have hundreds of purdy white flowers preparing to provide me with sweet juicy fruits, but whether they get to that point before they are torn from the earth has yet to be determined.


Never fear, however.  I will be replacing these wild fruits with a seedless variety next year.  The placement has to move, as they are a thicket of brambles about ten feet long, by five feet wide, by four feet high in an area nestled between our driveway, walkway, and deck.  You see, I don't do flower gardening.  It's just not my thing.  I want to get a viable product from my garden that will help me save some green and put food I know is healthy on my family's plates.  

The raspberries are wild.  Planted by some passing bird or small rodent in a bed that was intended (by the previous owners) to be a flower bed.  While I love their flavor and proximity to the back door, the once-garden space where they have taken up residence has become an over-grown jungle of weeds--raspberries included--and Rose of Sharon bushes.  And let's be honest, most of those bushes are weeds, too.  

So, while my garden won't be as big and luxurious--or perhaps junglefied is a better "word"--I will  still have my produce.  I will  have my beloved tomatoes, cucumbers, and green beans.  And you better believe I'll have my gourds.  I just have to finagle around to get what I want.  And I'll have to go without others, like maybe my summer squash, this year.


How is your garden coming along?

Monday, June 9, 2014

Mindful Monday: Help Helpful Toads with a Toad House

Despite their bad reputation in folklore and tales about evil witches, toads really are your princes (or princesses) in disguise.  

Let me explain.  (But keep in mind, I am not an expert in any measure.  My photos are labeled according to what I have read and are not substantiated by an expert opinion.)

Here in Maryland, we have two native species of toads:  Eastern American Toad (Bufo [Anaxyrus] americanus) and Fowler's Toad (Bufo [Anaxyrus] fowler). Both are found throughout the state, with the exception of the counties from Queen Annes Co. south to Dorchester Co. where the MD DNR shows no Eastern American Toads.  

Eastern American Toad
Fowler's Toad
photo from SREL Herp, credit J.D. Wilson


The Eastern American toad is slightly larger than the Fowler's, with females being larger than the males.  From what I can tell, the toads I've found closest to the house are the Eastern Americans, although it seems difficult to really determine which is which unless you're an expert.  And when you factor in the fact that the two species sometimes cross-breed, well. . .

So what, you say.  What's so great about a slimy (not), warty, poison-secreeting amphibian?  How about the fact that they eat just about everything that bugs you from dusk till dawn?  That's right, toads eat the bugs that drive you crazy during your summer evenings.  These include beetles, ants, moths and slugs.  Unfortunately they also eat earthworms, but that's what keeps the ecosystem in balance. 

During the day, the toads will find a cool dark place to rest.  This can be leaf litter, burrows, or under rocks or logs.  I had one toad that liked to burrow in my silver-tipped thyme pot every morning.  One evening I caught it on camera as it emerged for the night.


Of course, you can also provide a toad house in the garden for them.  Ideally, toad houses are made of ceramic, terra-cotta, or other such material that retains the night's cool temperatures.  They should also be placed in a cool, shady spot because even those materials will get hot if in direct sunlight.  

I have made two toad houses out of gourds, and while they are cute and whimsical, unless they are placed in a very cool spot, they are not good for toads to use as the gourds will get hot in the heat of summer.  The fist one I made was used once by the toad that liked my thyme pot.  I put it in the thick of one of the mint plants spilling over the edges of its container, and the toad huddled in for a day.


Now, most commercial toad houses only have one door.  You might think that seems reasonable since only one toad will take up residence in the house, but predators should be taken into consideration.  While birds can't see through the roof of the house, snakes and small mammals can get in through the door.  


Eastern Garter Snake attempting to eat a toad
that is too big even if it wasn't puffed up.

In these instances, a back door is vital to the survival of the toad inside.  You can make an escape route one of two ways.  If the house has a floor, another door must be made at the back.  You can also to that if there isn't a floor.  Or, you can place the house in loose soil and dig a small tunnel for the toad to use. They will like the loose flooring, too, for burying into during the day.  As you can see in the pictures above, they will completely cover themselves with the soil.  It keeps them cool, and the house above will offer more security.  (It's important to note that snakes may also take refuge in a cool toad house on a particularly hot day, so beware.)

So, go on and give those beneficial toads a little a/c for those hot days.  They will reward you by helping to keep down your bug and slug population.


Toad Power!


Information sources:
        Savannah River Ecology Laboratory (American Eastern, Fowler's)


This post is part of Fit Foodie Runs' Linky Party!

Friday, June 6, 2014

Feathering In Friday

The Little Littles--the Black Australorps--are ten days old today.  It really is amazing how fast they grow and get their feathers.  They are doing well with the five that are three weeks older than them, especially with Rocky mothering them.  She leads them to the food and water and puts herself between them and the Buff Orpingtons, who can be a little bullish with them.  (Toot likes to bite their toes.)  These girls don't have names yet, but one is smaller than the other two, and I've started calling her "Tiny."

The difference a week makes.
From tiny wing-tip feathers to full primaries.
This little Aussie is the first to start getting her tail.

Now the Big Littles are starting to look like little chickens.  It's hard to believe that only a month ago they were little balls of fluff no bigger than my four-year-old's hand. 

Bug with the Big Littles at one day old.

There's not much fluff left on them as they grow their "big-chicken" feathers.  They have been growing  their tails out, too. Especially, the Buff Orpingtons.  They are very proud of their long tails.  In fact, they are feathering in the fastest of the three breeds.

One, in particular is almost twice the size of the other two.  Her name is Pumpkin.  As in "Chubsy Pumpkin" because she looked much more round when they were a little smaller.  Now I'm beginning to wonder if "she" might be a "he" because the comb is a little bigger and more developed than the the other two.  Only time will tell for sure, but I don't care one way or the other.  One more rooster won't hurt the flock, and then Bug would have a rooster that looks almost like Mr. Bob's that the coon got.
Pumpkin's head, showing the comb
Pumpkin


James, on the other hand, is supposed to be a rooster, and I think they got it right with him.  This boy is heavy.  His legs are thick.  And, he is generally in charge of the brooder.  His tail is taking it's time, but I love how his legs are feathering out.  I think he's going to be stunning when he's all grown up into a crowing beauty.

James
And then there's our mystery chick, whom we have determined to be a Barred Rock.  Thus her name, Rocky.  Again, I wonder if I have another rooster on my hands, but as I have no other Barred Rock to compare to, I am left in limbo.  On the other hand, Rocky is my "mother hen." She takes care of the Little Littles, snuggling in with them, providing protection, and leading them to food and water.  Between her and James, I don't need to worry about those little Aussies.

Rocky


They grow up so fast!

Monday, June 2, 2014

Mindful Monday: ABC's of Composting


Did you know you can compost all year?  That's right.  You can toss your organic trash in your compost bin even in the dead of winter.  In the colder months the breakdown of organic material takes a little longer, but it still happens.  If you mix up your pile, you'll unearth a steaming mass of matter.  That steam is the proof in the compost puddin'.

I wanted to make a fun list of things you can stir into your compost puddin'.  Something you can share with your kids to help them learn about composting, but with amusing tidbits for the adults as well.

First, a brief reminder of the importance of balancing "greens" and "browns" in your compost.  The "greens" are the nitrogen-rich additives.  The "browns" add carbon.  I try to keep about a 50/50 balance, although there are experts and compost "companies" that give varying ratios.  The about 50/50 ratio is just easier, and it works for me.  To be honest, I toss my scraps and cuttings in about once a week and turn it about every two without measuring anything.  

Your compost bin should not have a stench to it.  If it does, add more "browns" and give it a turn. If you notice that it's not really breaking down, add more "greens" and a turn.  Keep it moist, but not soaking, and turn it every so often to keep the ingredients well-mixed.  I turn mine at least every two weeks, but usually more often.  But, no matter what you do or do not do, you will get usable compost. . . eventually.  The cycle of life says it must.

Now, my ABC's of composting:
Apple cores, stems and skins.  Seems obvious, I know, but I needed a starting point.  Greens


Banana peels are another great source of green compost matter.  Just make sure you remove any stickers.


Corks from your wine, or anything else that uses them, are compostable.  The wine will even aid the compost process.  However, with today's rubbery corks, it's important to make sure only real cork goes in the bin.  Browns


Dust bunnies and dryer lint are, perhaps surprisingly, fine to add to the compost.  Adding a bit of moisture helps it begin the process.  Browns


Egg shells, as long as they are crushed or powdered, are good too.  They add a bit of calcium to the final product, but they take a while to break down.  That's okay, though, since the crushed shells are a deterrent to slugs.  Neutral 


Fish tank water is one of the best things you can add to your compost.  Heck, you can pour it straight onto your garden.  The emulsion is very high in nitrogen, making it part of the greens in your bin. 


Grounds of coffee from your machine are great, too.  Add them right with the paper filter because that is also compostable.  Coffee grounds are another additive that can be put right on the garden, but I would be shut to mix them into the soil.  Worms love the grounds.  Greens


Hair and animal fur can be composted.  So clean out your brushes and scatter the hair in your bin.  It works a little better if the hair or fur isn't clumped.  Greens


Ice cream when it's melted is fine to toss in the bin.  I found quite a few places that said "melted ice cream," but none of them stated why it had to be melted.  So, my guess is that the cold is counter productive to the composting process.  Since the microorganisms and other creepy-crawlies that do the breaking down of material create heat, they probably wouldn't be too happy if you dropped a block of frozen ice cream on them.  There's the possibility of creating thermal shock and killing all those organisms that come in contact with it.  Greens


Jams and jellies, being made from fruit and sugars are another obvious add.  Greens


Kiwi skins.  Okay, okay.  It's hard to come up with something unique for every letter of the alphabet. Bare with me here.  Greens

Leaves, both fresh and dead, add browns to the pile.  They break down faster if that are shredded or chopped.


Manure.  Can I say enough about this fabulous, odiferous material?  After all, composted sheep manure gave me the name for my blog, for that is what I put on my garden and in my compost every year.  The stipulation is that the manure should come from herbivores.  Dog and cat feces is not something you should add to your pile.  However, that from sheep, horses, cows, and goats is fine.  Also, if you use pine shavings for your rodent or feathered pets, or another natural bedding for reptiles, that can go in the compost.  Browns


Newspaper is okay to add, too.  Avoid the glossy pages, though.  Ad be sure to shred or tear it to aid in the breakdown.  Browns

Orange peels are fine, but again, they should be broken into smaller bits before getting tossed in.  I put mine in the food processor and pulse them until they are almost a pulpy texture.  That way the acids contained within can be spread around instead of concentrated in one area.  Greens


Paper towels and paper napkins (and toilet paper) will decompose well in the compost.  Food and drink debris is fine, but make sure they weren't used to wipe up chemicals. As with so many other things, I like to tear mine up.  I also only use white.  When white isn't available, I don't throw the towels with dye in the bin.  I'm just not sure about those dyes.  Browns


Q-tips are another source of brown material.  Be sure that the stick is cardboard and not plastic.


Rice, brown or white, but it needs to be plain.  No fried rice, or rice slathered in butter.  Fats are not good for compost as they create a barrier of sorts to the process.  Greens


Sawdust from untreated wood and lumber is another way to add browns.


Tea is a great addition to the compost.  You can toss the whole bag in, but be careful of the tag, string, and staple some varieties have.  Greens


Urine.  Okay, I had to get creative with this one, but it's true.  Urine can be added to the compost.  


Vacuum contents follow the same line as the dust bunnies and dryer lint.  Assuming, of course, that there aren't any Legos, twist-ties, or other non-biodegradable stuff in there.  And don't toss the bag in.  Browns


Wood ash is okay in small increments.  Too much can hinder the composting, though, so be careful.  Neutral

 X-mas trees and wreaths are suitable for composting, but since they are so big, they should be broken down into smaller pieces.  Most bins are too small for a full-size tree anyway.  I have a separate pile for trees and other such large objects.  If you do put your tree in your bin, make sure to remove all tinsel.  Browns


Yard waste like grass clippings, small sticks and twigs, plant pruning, and weeds that haven't gone to seed are great browns to add.  It also cleans up your yard.  Browns


Zucchini.  Another obvious thing to toss.  Z was hard, though.  Greens


Happy composting!

This post is part of the Clever Chicks Blog Hop!
It is also part of Fit Foodie Runs' Linky Party!