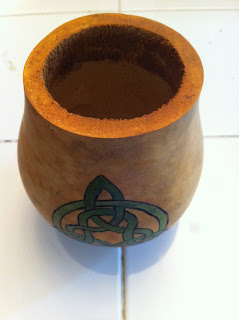
Let's start with the simplest one. The smallest one. I don't have a sequence of photos for this one, but I don't think it really needs all that.

It's a little vase of sorts, but it won't hold water so silkies only. ;) It would also make a good pen holder or other such utensils. Paint brushes?
The rim and just inside are stained honey, as is the outer shell. The Celtic Trinity knot is a bit darker than the ring, but both are green with a golden gleam.
The next two are both bowls crafted from the bottoms of two gourds. Cutting the wavy lines I wanted for the tops was a bit difficult, but my wonderfully handy husband helped. Together we muscled the pneumatic saw back and forth, from beginning to end. Twice. The result was a lovely undulating top line for both bowls. Then I used the cleaning ball to make the insides pretty, too.
I started with a Celtic Trinity knot with an interwoven heart for one. The other got an intricate Celtic knot shamrock pattern. But we'll get to those details in a bit.
The Trinity knot was burned using my not-so-wonderful craft pyrography tool, but I was happy with the result.
Then I added some green around the design.
I must say, that with cleaner lines this would be a spectacular look all to itself, and I will probably attempt some such effect on a future project. But this baby was destined to be green!
After one coat of green ink dye it wasn't green enough, so I heat-set the first and added another.
Then I came to play a horrible waiting game. The color I wanted for the knot itself was coming form California. When you live on the East Coast, it takes about a week to get goodies from the West Coast. And when it finally arrived I couldn't wait to break it open and start playing.
 |
| California Goodies Heat-activated glue, gold pigment power, silver pigment powder |
The tiny holes along the rim had a special purpose, but first I had to mix the green ink dye with a tad bit of white and a generous glob of gel. The gel allows the the ink dye to not be absorbed by the porous inner surface of the gourd. Without the gel, the gourd would absorb the ink dye, and it would just look black.
Then I had to get the supplies for the tiny holes and work a bit of magic. Well, okay. No magic involved, just crampy hands, tired eyes, and time.
 |
| Trinity Heart with bead work |
 |
| Back of Trinity Heart bowl |
The other bowl--the one with the shamrock knot-work--had it's own version of Gaia's mark. This one didn't show up until deep into the project, and was much more frustrating.
 |
| A portion of the penciled design and the holes whose purpose you now know. |
 |
| The first Shamrock is painted with gold-tinged green. |
 |
| There are 5 Shamrocks in all. |
 |
| The background is a darker green tinged with silver. In the reflected light you can see the difference between the gold and silver. |
So I carved the outline of each shamrock, and that tainted area became the back. That's how I would display it, anyway. I do love this bowl even though it isn't what I had envisioned. It will get golden beading around the top once I get more beads.
I'm not sure if this one will go up for sale or be given as a gift to one of my many Irish friends. (I would hope that, if given, the recipient could look past the learning curve that this piece ended up being and love it for the heart put into the work.)
 |
| It doesn't look bad from the "front." |
 |
| My signature initials carved in the bottom of the Shamrock bowl. |
I will be adding a page to the blog where you can see all of the projects together and get information on purchasing.


.jpg)
.JPG)
