Wednesday, May 15, 2013

It's All About the Land. . .

Before I start, let me just warn you that this is going to be unreservedly random.  (Using that adjective gives me poetic license to go off on tangents whenever I so desire. ;) )

Mother's Day is usually when my garden is tilled.  It's always part of my husband's gift to me.  This year that didn't happen, thanks to Mother Nature and her torrential rains Friday and Saturday.  Still, Sunday was beautiful, and dry enough to get my raised bed for my strawberries placed and filled with some very stinky garden soil.  That would be Miracle Grow Garden Soil.  It smells like rotten sewage. I hope that means it's chock full of good nutrients for my strawberry plants when they arrive.
 My asparagus arrived about two weeks ago, which is two weeks earlier than they told me.  Since I don't like to plant before May 15, I had to read up on how to keep them until then.  Simple, just put them in the fridge.  But I also had to read up on how to plant them.  That's not a simple.  They will be a permanent fixture in the garden, so I wanted them away from the tilled patch.  Since the strawberries are also a permanent fixture, I decided to plant the asparagus the length of the garden behind the strawberry bed.  In the picture below, it will form a row in line with the strawberry bed heading toward the trailer in the background.
Mommy's Little Helper
My neighbors have granted permission for me to use their lower garden bed for things like my pumpkins and watermelons.  I may put my butternut squash in there, too.  You know, the lower maintenance crops that don't need checking every day.  I have to till and row that too.  To reciprocate their generosity of land use, I plan on helping them with their own garden by tending the blackberries and grapes, and helping with planting and picking.  Unless his grandkids help with the planting like they did last year.

A quick little tangent here . . . I have found the perfect way to season just about any veggie.  Butter, salt, black pepper, and garlic.  Now I use garlic powder because it dissolves into the butter when a minced clove would not.  The flavor is probably better with a clove, but I'll stick with the powder for now.  And please don't ask me for measurements.  The only time I measure anything is when I'm canning, and only then because I have to.  Oh, and for baking stuff, too, because cackes and other sweet treats just aren't right if you don't measure.

So I was talking to my husband after visiting my neighbors one day.  (Here I'm leaving information out because I don't want to be assumptive or jinx anything.)  Anyway, in talking a few things over with him he said that I could have a horse if we had the land to keep it ourselves (either here or somewhere else).  I can't have a horse and keep it at the neighbors' house just because they'll let me.  He doesn't want to pay board, citing it as a waste of money.  I totally get that.  And I wasn't arguing with him on this.  This was the first time he has ever accepted the fact that I am a horse woman, and once a horse lover, always a horse lover.  He has told me that he doesn't want me riding anymore (not that I have in quite some time) because it's too dangerous.  "Horses are wild animals," he once told me while I rolled my eyes behind his back.  But apparently, he is coming to terms with the fact that I will never give them up.  Maybe my obsessive following of horsey pages, rescues, and activists groups on Facebook have shown him that.  Honestly I don't care why he's come to this.  The important part is that he has.  He even pointed out that he said he would buy me a horse.  (But, you know, fellow horse enthusiasts, horses need friends. ;) )  I found myself foolishly trying to convince him that I would feel obligated to pay the upkeep costs myself, and that I wouldn't be comfortable without having the money for emergency situations.  (Past experience has proven that to me.)

We are worried about the farm across the street.  What if they didn't sign that tax thingy that forces the land to be used as a farm for 99 years before it can be developed?  That would mean that a developer could buy the 40 (+/-) acres and use it however they want.  Although, I think a good portion of it would be expensive for them to try to develop because of water and boulders.  But regardless, I love looking out my front windows, or playing on the front lawn with my boy, and seeing a vast field with bronze-tipped Timothy dancing in the wind.  The thought of seeing the bordering trees cut down and houses pop up sickens me.  
But the 1.5 acres directly across the street form us is owned by my neighbors next-door.  The ones that have the chickens Bug so loves to feed.  Imagine having that piece.  If developers did come in to desecrate the farm, we could save the small piece in front of us and plant a row of trees along the back to block the atrocities.  

And, while he didn't exactly say we could have them, my dear husband said that chickens would have to stay on this side of the road to offer more protection from the foxes around here.  I know my neighbor won't have chickens forever, and Bug can't eat store-bought eggs.  Most places that sell farm-fresh eggs are priced high, at $3 or more a dozen, so getting our own chickens is inevitable if you ask me.  
In the chicken house.
I want a huge garden that will provide for my family throughout the year and possibly earn me a little extra cash from produce sales.  The bushes and flowers in the beds at the side and back of the house can go in favor of root crops and berry bushes and I wouldn't shed a tear.  (I would replace the butterfly bushes, though, because we love the visitors to those.)  I want chickens for my own eggs.  And I'd love to have a horse or two, and goats or sheep.  Growing the gourds can also be a profitable venture once I can get it rolling.
Bug loves every aspect of "gourding."
Living where we do has proven to me that I have a farmer's heart.  I want to tend the land and grow my own food.  I want to keep animals like livestock and poultry.  And I want to pass this love for the land on to my son.  (The older one is a lost cause here, as he would rather sit in front of the TV all day no matter what the weather.)  And Bug shows great promise in all aspects of a "farming" lifestyle.
Sharing the love of farming.
Here's to dreaming of the sweet smell of Timothy, the muskiness of a barn, and the delicacies of my labor.  Hooray for farming!

Monday, May 13, 2013

The Frog Prince . . .

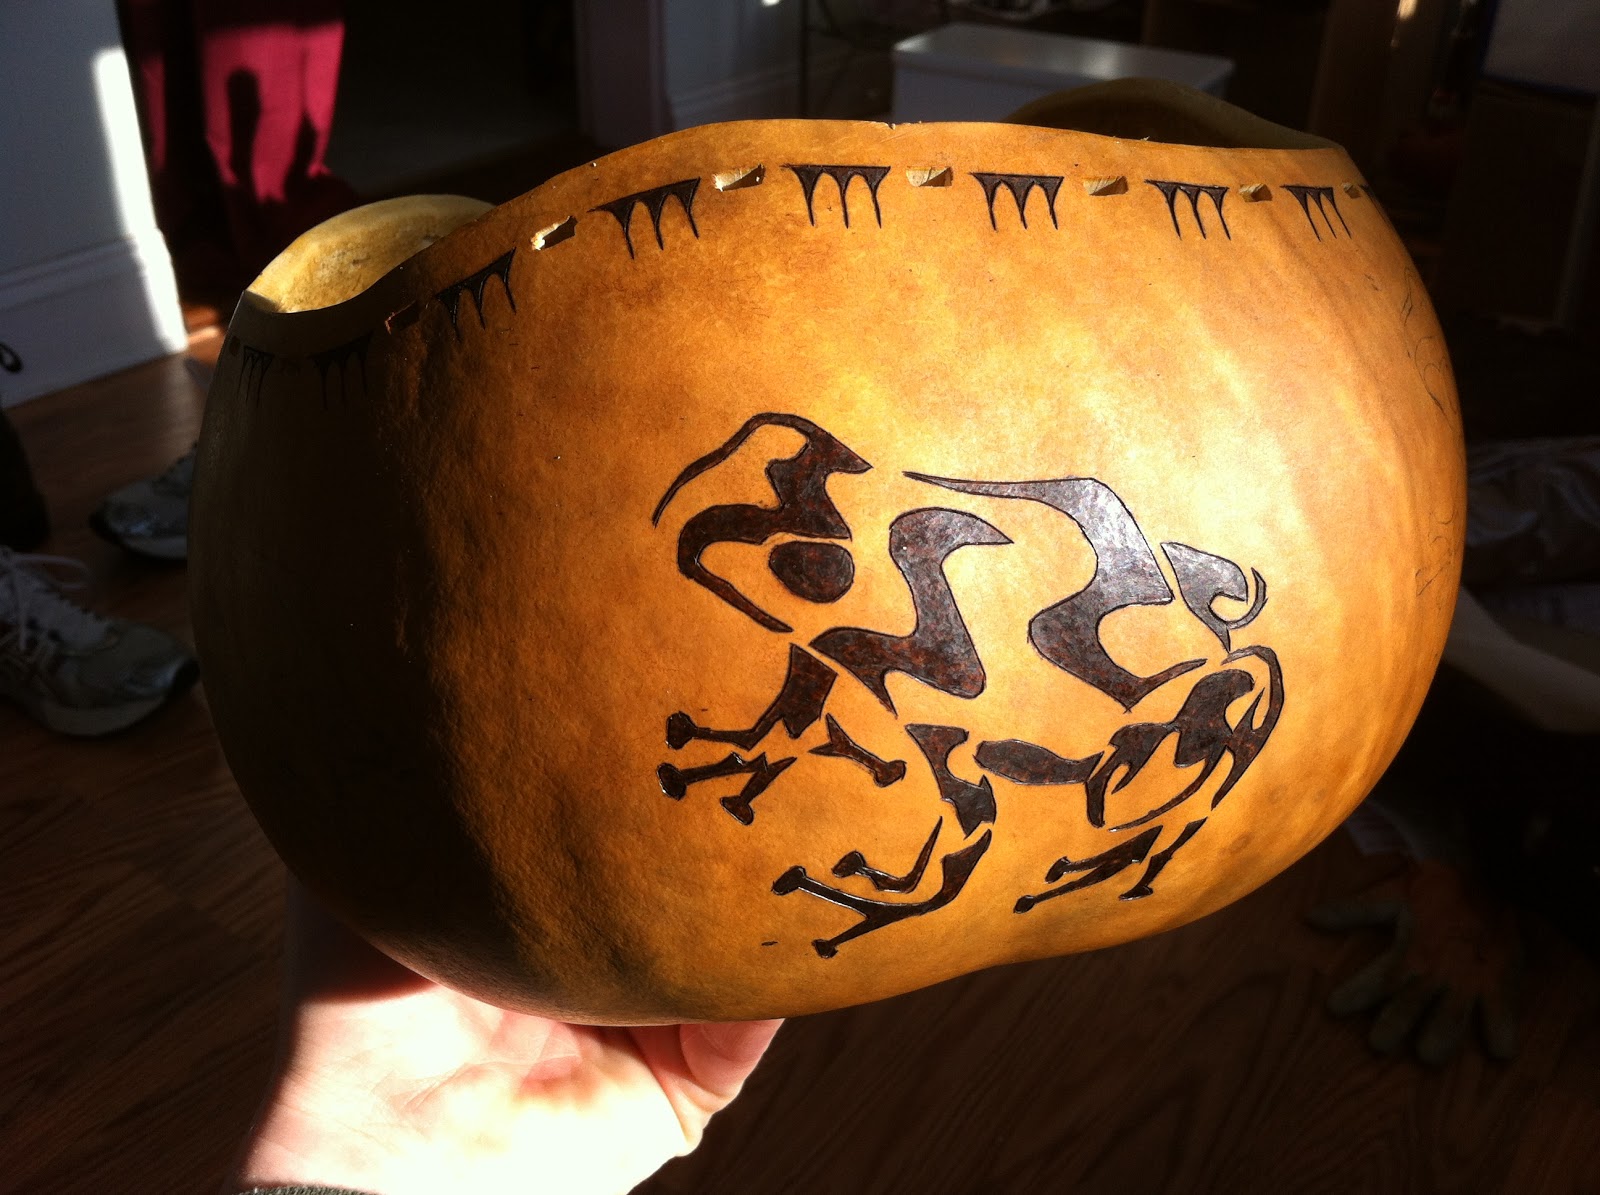
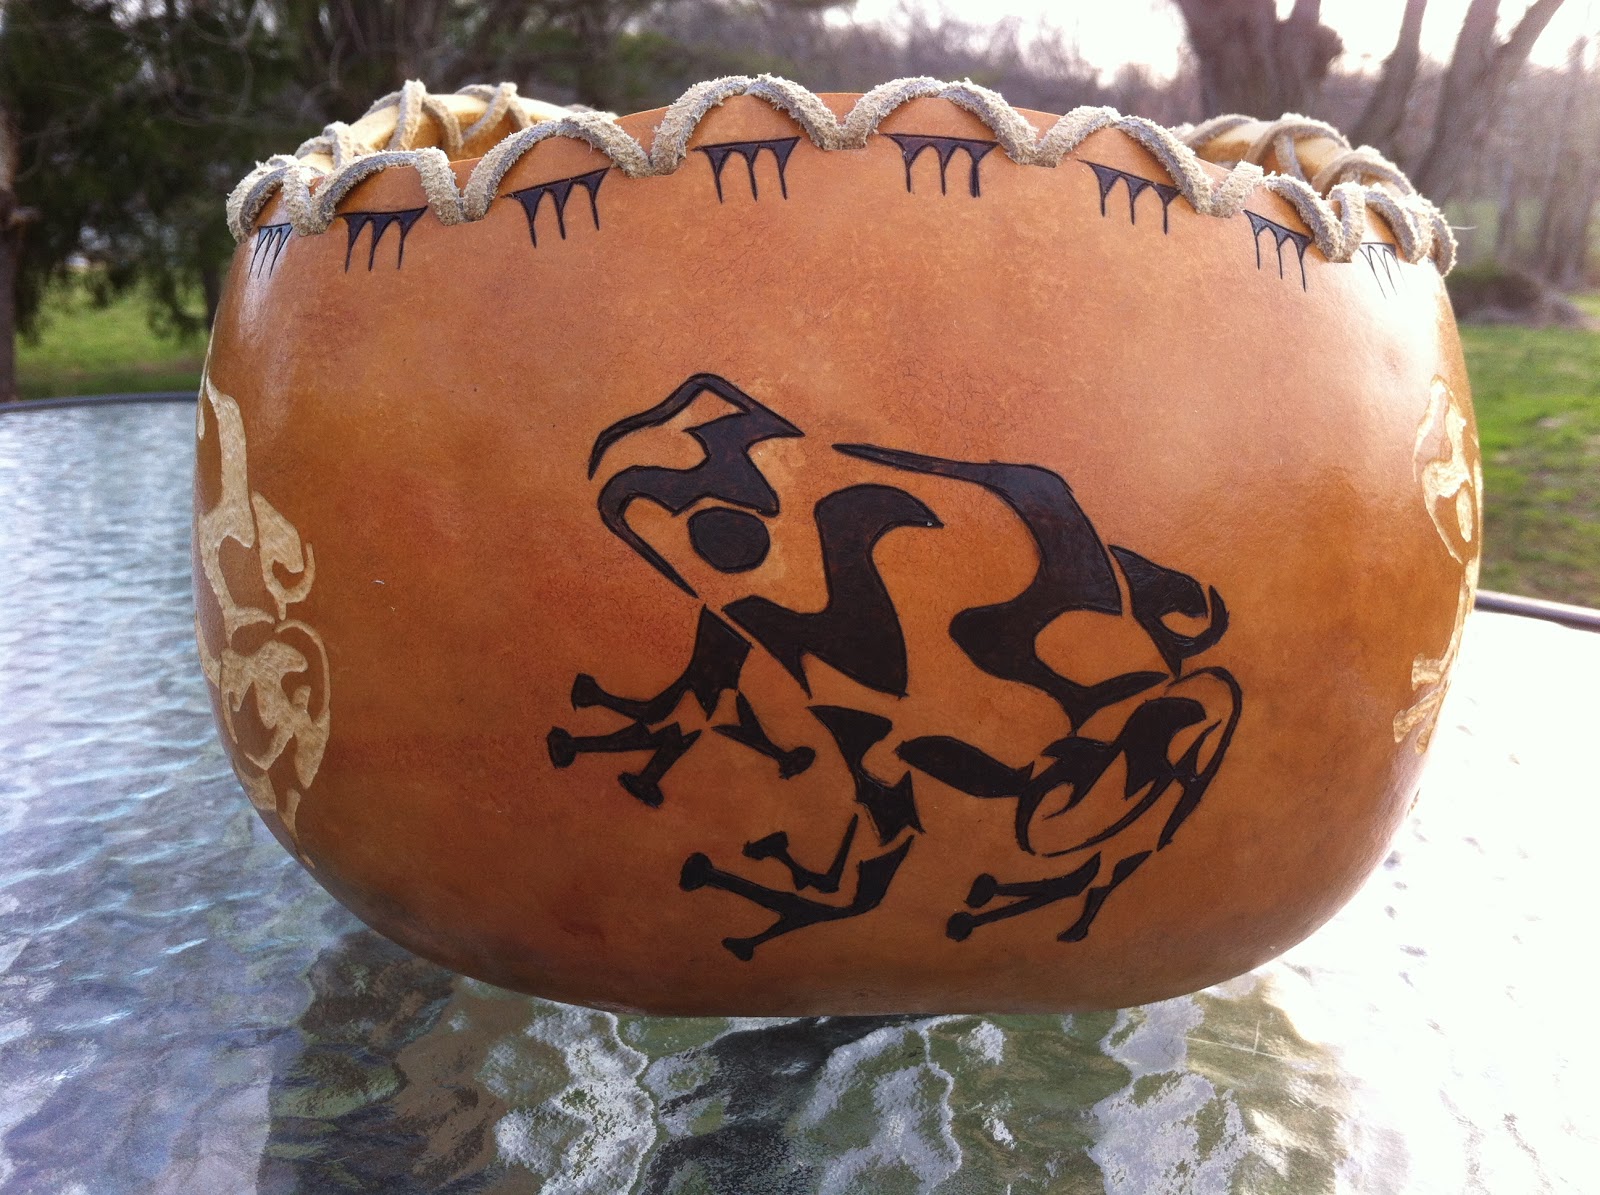
Well, maybe not a prince.  Not even for a prince, in fact.  The bowl featured in this post was my Mother's Day gift to my frog-loving mom.

Now, this particular gourd has a story to go with it that began two years ago when Mom and I first attempted growing gourds.  We weren't sure how it would go, but I followed the instruction I found for hand-pollinating the female flowers using the pollen from the males.  It was a couple weeks until we found this gourd growing inside one of the socks used to prevent cross-pollination.  It was the first one we found, and we found it on Mom's birthday.  Right away, I decided that this gourd would be a present for her in the future.  A few weeks later, I tied a ribbon loosely around the stem so I wouldn't mistake any of the other gourd growing so emphatically for for this, our first one.

When it came time to harvest the gourds for the winter, I simply memorized what this one looked like.  After all, each gourd develops its own shape and coloring, and the stems are like fingerprints in their own way.  I watched this gourd closely, afraid that something might happen to ruin it as it "seasoned."  But it came out of the winter and spring seasons unharmed and in terrific condition for crafting.  Unlike most of the other gourds, the coloring was pretty even, giving me a canvas that was virtually blemish-free.  

Deciding what to do with this fantastic specimen, something to make it distinctive for a very important woman, was difficult at best.  It sat in a corner of my sunroom where I could see it every day.  The ideas it inspired varied from simple burning, to carving ivy vines, to something as intricate as a carved vine with some of the leaves cut out.  But it sat there for an entire year before I finally decided to cut off the top and make a bowl.  The frogs came later.

Here is where I warn you that I have forty-four pictures of this project, and while I will not post all of them, I will post a lot.  I am very proud of this project.  And, while some parts of it were a learning curve, I couldn't be happier with the results as they developed before my eyes.  Somewhere I have pictures at least of the harvest, if not the growing process, but alas, I can not locate them in the vast folders used for my gardening endeavors.

So, without further ado, I present the pride and joy of my gourd crafting to date . . .

As Maria sings in The Sound of Music, let's start form the very beginning.  These little buggers were tough to place.  I tried several times to place the six frogs evenly around the bowl.  I failed miserably each and every time.  Finally, I broke down, dusted off the old math skills (utilizing my husband for decimal conversions), and got them in place using two rulers.  One for between the frogs, and one from the table to the top of each frog.  It was tedious, yes, but the results were more than satisfactory.  See, you never know when those math classes will come in handy.

After tracing each of the six frogs, I removed my print copies to reveal the "pencil" lines beneath.  


I started with the burner.  I used Mom's because she got this awesome one from Arizona Gourds, and I wanted to try it out.  Besides, I was burning sharp details.  There was no way my fifteen dollar craft burner would make the grade.  This precise burner, however, was like using a razor-edged marker to trace the lines.  It was that precise.  I still had to get used to it, considering this was the first time I'd really used the thing.  I had done a few lines and such on a scrap piece, but that was it.  I was jumping in with both feet and hoping my air tank worked.
First shape outlined.

One thing that was spectacular about this burner was the sensitivity in the temperature dial.  A millimeter of movement changed the results dramatically.


The toes, I found, were especially difficult.  I had to turn the tip at just the right speed to avoid over- or under-burning.  I also learned that I am better at making counterclockwise turns from left to right.


First frog outline burned.

Started shading with the eye.
 Time for the shading, and this I practiced a bit first.  I had to get the angle and temperature right to avoid making lines in the shading.  But once I got the fine-tuning, it was easy.  The shape of the tip helped with that a lot.
Half shaded

First frog fully shaded.
I knew what I wanted to do for for the top of the bowl, but I thought that just having three burned and three carved frogs wasn't enough.  It needed something to accent the top.  I decided on a simple tribal element between the places where the wrap would go through the gourd.  More measuring for precision, but again the results were well worth the extra time. 
Penciled tribal element.


Tribal element outlined.
Tribal over burned frog.


I was really happy with the contrast this provided.  It was the perfect addition to the rim, and you will see just what I mean when the wrapping is added.


Tribal over frog to be carved.


So then I broke out my Grandpop's old Xacto carving set.  I chose a chisel blade and I used it to cut rectangular holes between the tribal patterns.  Once the hole was cut, a square needle file just over 1/8 inch wide smoothed and evened out the holes to the perfect size and shape.  Using these hand carving tools made me wonder if maybe I could do some carving by hand.  It was rewarding in so many ways.  And, I fell in love with the outcome.  In fact, I liked the look so much I toyed with the idea of not wrapping it at all and just leaving the holes empty.  
Xacto chisel and square needle file with first hole cut.


Dyed outside
In order to even out the few areas where the gourd shell was a bit off, I dyed it with honey ink dye.  I dyed the inside, too, by mixing a fair amount of a special gel with the color.  The gel keeps the porous areas of the gourd from absorbing the dye, thus avoiding an overly dark (or even black) appearance.
Dyed inside


Now the fun part.  I have found that I love carving.  By hand, with a Dremel, it doesn't matter.  The detail and depth that can be achieved is amazing.  And it's all by chance for the most part.  Well, maybe that's just because I'm still in the infantile stage of my craft.

I started carving the outline of the frog first, using a tiny little ball carving burr in my cheaper non-Dremel rotary tool.  The tiny ball allowed me to get the finer points carved without rounding them out too much.  I also used this burr to carve the middle out of the narrower portions because the next size up was too aggressive.  But I did switch to that next size for the larger areas to be carved.


You can see how just having the rectangular holes cut between the tribal designs sets off the rim without needing the wrap.  I ended up doing the wrap because it softened the look of the rim.

A lesson I learned with the burning and carving is the order in which they should be done.  Carve first. It makes so much dust, that it sticks to and lightens the burned outlines.

Before I started wrapping the leather lace, I sprayed the gourd inside and out with a semi-gloss poly spray to protect it.  Then I got to work on wrapping the lace.


Start of the lacing.
It was easy enough to get started since I only had to wrap it in one direction.  But I had to keep it loose because the next step would require finigling at every turn.  I fought with the lace to fit two strands through each hole, and to keep it from twisting.  I had to use two lengths of lace and figure out how to tie off the ends without using knots.  The effort was well worth the payoff, though.  
Top view of lacing.
"Tied off" ends.

I love the look of the crisscrossed leather lacing accented by the tribal points reaching toward the juxtaposition of the darker burned frogs and the lighter carved frogs. 


 But you decide for yourself.  How do you like my Mother's Day gift for the best Mom--and Grandmom?  (Let us know what you think in the comments below.)


Tuesday, May 7, 2013

Wedding Candle . . .

On her birthday--of which age will not be mentioned--my cousin was married.  It was Saturday, the fourth day of May in the year 2013, and it was a beautiful day for a wedding.  My cousin, who is a tall woman, wore crazy-fun shoes with a 4-inch heal and was still shorter than her groom.  (Wish I had a pic of those shoes.)  

But I digress.  This is about the gift I made for the happy couple, and it's journey from raw gourd to finished product and wrapped gift.


After cleaning and sanding the Roger 6.2 gourd, my husband helped me cut a hole through the top.  I used the small cleaning balls to clean out the inside as best as I could.  I filed the sharp edges around the hole, beveling it just slightly so the votive holder would be a little more flush and secure as it sits in the hole.


Raw hole


Votive holder in raw hole.
You can see here why I beveled the edge a bit.


This gourd was pretty stable on its own, but seeing as how my cousin has a rambunctious horse living in her house, I thought it would be a good idea to use a belt sander to flatten out the bottom a little more.  You know, just for added security.  (Oh, and Koda isn't really a horse, but a young Newfoundland overflowing with energy who thinks he's a lap dog.  So, a horse . . . in the house.)

There is a lot of free clipart online, and I used one that I modified to create the Lilies of the Valley artwork on the front of the gourd.  I printed the art, taped it to the gourd with carbon paper behind it, and then traced.  Most of the finer details were left out because I'm not anywhere near ready for that kind of burning.  The lettering is my own, done in pencil after the tracing was finished.


Since it was so late when I broke out the burner, I started with the leaves.  Long, straight-ish lines are easier when I'm not fully energized, and my eyes get lazy after my boy goes to bed, so the leaves were the starting point.

The bell-shaped lilies came next.  Tough little boogers, they were.  With their tight turns and turned out petal tips.

Finally I burned the Violets and Johnny Jump Ups at the bottom of the design.  

I must say that I really liked--and still love--the two-tone effect of just having the flowers burned into the gourd,and not colored.  But, seeing as how this was a wedding gift, and I wanted it to be special, I went ahead with the dying.


With the coloring, I again started with the leaves, but not for ease of application.  I wanted to start with the darker colors and work my way up to the white of the lilies.  That way I wouldn't be getting green and dark purple all over my lighter-colored flowers.


It was a dance of color experimentation to get the effects of darker and lighter that I was aiming for. For the violets, I mixed white and purple dyes to get a lighter shade.  

My first attempt at the purples and white had blue hue ghost pearl mixed in.  This is actually a color my husband gave me from his car paints.  It's a powder, and I thought I could work it like the gold and silver pigment powders I got from Welburn Gourd Farm, mixing it into the liquid dye to give the dye a pearlized effect.  It didn't work, as my husband had told me.  With the pearls--ghost pearls, at least--you have to apply them on top of the base color.  
I will say that when the dye was still wet, the pearl was clearly visible.  It was only once I heat-set it that the color dulled out and lost the sheen.

For the yellow on the Johnny Jump Ups, I blended a classic yellow ink dye with a hint of gold pigment powder to give it some glisten.  

The white of the lilies didn't take to the pearl at all.  Which was fine in the long run since I was going to have to apply the pearl with glue anyway.  But I was pleasantly surprised at the tinting of the white.  It wasn't too transparent, but that also could've been from mixing the pearl into the first application.  


Over all, I was really pleased with the coloring before any more pigment powder was added.  The shading in the leaves was just right to give the effect of different layers.


After giving the background a light honey finish to even out the blemishes, I started on the lettering.  For this, I painted the letters with black heat-activated glue.  The black color gives the pigment powder a more solid base, making the color of the powder stronger.  Once I heat-set the glue, I dusted on some silver pigment powder using a soft makeup-style brush.
The camera just can't capture the shimmery essence of the powders.  It sparkles, I promise.  In the sun, it's spectacular.

Once that was done, I used clear heat-activated glue on all of the flowers--except where there was already gold powder, because that was already shimmery gold.  The blue hue ghost pearl was dusted on, creating a beautiful simmer across the flowers.  (Shimmer is the word of the post, if you haven't noticed. ;) )  Of course, the pearl can't really be captured on camera either.  Maybe one day I'll figure that one out.
I had to go back and re-burn around most of the flowers because the powders stuck in the crevices.  That was annoyingly tedious, but oh well.  The finished product was well worth the work.

I thought I should put the event date on the gourd, too, it being a wedding and all.  So I decided to do it small on the back.  My very first attempt with pencil was perfect, and that never happens.  
Perfect Pencil


Bleeding Ink
I tried to just trace it with ink dye using a micro tip applicator, but failed miserably.  Apparently the process of cleaning off the mussed up ink left traces of the solution even after wiping it off with a damp cloth.  Therefore, when I tried again, the ink bled.  I was, however, at the point of saying it just isn't that important, and so I traced the date with the burner.  It helped a little bit, but I will forever be discouraged by this particular portion of the wedding gift.  My consoling factor here is that it was a gift for my cousin from the heart, and I know she will appreciate it no matter what.

I then took the finally completed gourd outside, sprayed the inside with a finish as best I could, and hung it upside-down on an electric fence post.  This is the best way I have found for spraying the outside with the finishing spray.


So here is the final result shown with the votive holder and candle I provided.


And here is the presentation of the gift.  (Mind you, the gourd and candle were wrapped in bubbles.)

I really hope they like it.  I wish them and her kids nothing but happiness in their new life together.