Wednesday, April 30, 2014

Expanding the Herb Garden

Herbs fascinate me.  They add worlds of flavor to foods, giving the cook the ability to transform an ordinary meal into something extraordinary.  They can be made into teas with flavors that delight the tastebuds.  They can be used to give a subtle scent to a room.  They have insecticidal and repellant qualities for creepy crawly and furry pests, alike.  They have been used for centuries in medicines and tonics for everything from stomachaches, to insomnia, to skin care and whatever lies between and outside those blurry lines.  If there is an ailment, healthy quest, or desire for beauty, you can bet herbs have been put to use.

I have a deep desire to learn as much as I can about Mother Nature's chemical-free cures.  I want to make teas for common ailments using what grows in my garden and yard.  And I want to be able to make cleaners and scents for my home that don't have the chemicals found in store-bought varieties.

This year I am expanding my herb "garden" to include a few more of these incredible plants.  I am also learning which ones are annuals and which ones are perennials in my area (zone 7).  

Apple Mint                                                          Peppermint                                                    Orange Mint

I have five varieties of mint at present.  They are one of my favorite herbs because they are quick to grow, they always comeback, and the scents and flavors are fantastic.  Pull a few leaves from orange and chocolate mints, crush or bruise to release the oils, and infuse into a jar of sun tea as it steeps in the summer sun.  

They also have rodent and insect repelling properties.  I'm not sure if it matter which kind, but I bought some extra Peppermint this year so I can provide my chickens with my older plant as both a yummy treat and to help keep the mice down.

Rosemary
Rosemary is another favorite.  I love the piney aroma and the dark green foliage.  You only need a little bit to kick up the flavor of your food or the scent of a potpourri, and it's great with beef and other red meats.

Last year I got one plant, and it died over the harsh winter.  This year I bought two.  

Now, this plant is a perennial from zone 8, south.  I have heard of people in my area that have large Rosemary bushes.  My favorite stand has one, as well.  Mine, in their smaller containers, doesn't make it.  For now.  I will eventually have a permanent herb garden where I can plant it in the ground and provide it with what it needs to survive our colder winters.

English Lavender
Ah, Lavender.  The mellow beauty that perfumes the air and helps us relax.  I added two new plants to two plants from last year with the hope of doubling my harvest of the pretty purple flowers.  I may need to replace the ones from last year, though, as they aren't looking too healthy right now.  

This perennial thrives in drier climates, but does just fine in the more humid area I live in as long as it has good drainage.  It is hardy from zone 5, south, but will do fine above that with winter protection.  I think that's where my lavender got hurt this year.  Our winter was so much colder than normal, and I think my plants suffered.

I will show you how I harvest and dry lavender flowers in another post, but you can use fresh flowers in teas and desserts.  I haven't done this yet, so look it up before you try.

Last Year's Lemon Thyme
New Lemon Thyme
Background: old Lemon Thyme & English Thyme


I discovered Lemon Thyme last year and fell in love.  The scent is that of fresh lemons.  (Dried, it's even stronger.)  When last year's plant went to seed, I sought advice on how to collect them.  I was told by experts and hobbyists, alike, that Lemon Thyme is a hybrid sort of plant and will not breed true.  Meaning the seeds won't grow a new Lemon Thyme plant if they grow at all.  

I was also told the plant is an annual, so I was disheartened to learn I couldn't grow my own for the next season.  However, this year when I was checking my pots and plants to see what I had, what I needed, and what I could add I noticed that my old Lemon Thyme plant had little leaf buds.  I bought a new one, anyway, but I'm hoping that all those people were wrong and my plant will come back this year as the English Thyme does.  Then I'll have two!

Lemon Balm
Lemon Balm is used for so many things from cooking, to teas, to medicines.  I believe it also has some anti-bug qualities, but I have to look into that a little more.  I have been wanting to add this highly useful plant to my herb garden fro some time, but this was the first year I found it. . . and had room for it.  I have read that it gets big, so I put it in the pot I used for my deck corn last year.  

Garden Sage
I am also new to Garden Sage.  I haven't used this variety of sage at all, so everything about it is new to me.  (I had pineapple sage one year and loved infusing it into my sun tea.)  I'm excited about the possibilities of this popular herb.  I know I can cook with it, and it's good for my chickens, but I need more information on the specifics of using it.


What herbs do you grow in your garden?  How do you use them?


Monday, April 28, 2014

Mindful Monday: Conserving Water

For Earth Day this year I pledged to use less water.  While I may or may not have achieved my goal for that one day, I am making an effort to apply it to my everyday life.

Clean water is one of the most precious commodities on Earth.  I am blessed to live in area where we not only have clean drinking water, but we also receive our fair share of precipitation.  That’s not to say we don’t have droughts and water restrictions, we do.  But they don’t really last long, and they are incomparable to those in other parts of the world.


Check out this billboard in Peru that collects water from the air and turns it into clean drinking water.  

That being said, I have started to do my part to try to conserve water where I can.  
  • I turn off running water at times when I used to let it flow.  Like when I’m waiting for the water to turn hot.  I used to let it run until it was hot, but now I just use what I have no matter the temperature.  
  • I use the rain water collected in my empty plant containers to water the ones that have plant in them. 
  • We just purchased a high-efficiency washing mashing that seems to use hardly any water at all.  I find this thing amazing to watch as it washes my clothes because it uses so little water and gets the same results as our old washer.
  • I load the dishwasher so it’s full, but not overly stuffed.  It’s no good to save water on less dishwasher cycles if you’re re-washing the dishes when they come out.
There's also this:


I really want to make a rain barrel, and while I may not be permitted to put it by the house, I could put one behind the big garage by the garden.  It’s even uphill from the garden, so the pressure from the water in the barrel should be enough to attach a hose for watering farther away.

Once I get this up and running, I promise to share the entire process with you.

I know this isn’t much, but it’s a start.  Small steps are better than no steps at all.


Make every drop count.

Wednesday, April 23, 2014

Easter, Revisited

Last week I posted about making your own dye for Easter eggs.  I hadn't yet tried it out for myself, but I promised I would.  And I did!  

It was great fun creating our own colors using the method I posted here.  The colors were incredibly intense, and it took less time to get the vibrant colors than using the tablets. I did use the higher number of drop recommended, so that played into our results.  (I've yet to master the art of photographing vibrant colors, so the pictures aren't fabulous.)


My husband and our oldest boy always make what we call a "dinosaur egg."  It's a blend of all the colors in random order and back again.  This year, instead of being ugly, it turned out a purplish -black color.  (It's the darkest egg in the pictures.)


Another thing that happened faster with the homemade dyes was the "breakdown" of the colors.  When the boys were finding the eggs on Easter morning, we all noticed there were spots on most of them.  While it may look unattractive to some, I think it adds more character to the intense colors.
Spotty Eggs
The top left is the "dinosaur egg."
I like this egg's changes.  It reminds me of a Water Dragon egg.

Bug got a kite in his basket, and we had a wonderful time flying it in the field.


 Rejoice!

Monday, April 21, 2014

Mindful Monday: 3 Ideas for to Make Earth Day Every Day

Tomorrow, April 22, is Earth Day.  Earth Day was founded in 1970 by then Senator Gaylord Nelson from Wisconsin who thought to put the energy of the antiwar activism to work for environmental awareness.  He was hugely successful in creating a national awareness and later taking that awareness to a global level in 1990.  In 1995 President Clinton awarded Senator Nelson the Presidential Medal of Freedom, which is the highest honor that can be awarded to a civilian, for his role as Earth Day founder.   (You can read more about the founding of Earth Day here.)

Usually I plant something, or do some other sort of earthy activity fro this day that is very special to me.  There are tons of Earth Day crafts for kids all over the internet.  There are shirts and totes and such for purchase.  You can go to events in honor of Earth Day.

This year I want to do something different.  I want to make a commitment of conservation.  I realize that there are lots of people and companies who challenge us to make these commitments to change our lifestyles, but I think that tends to be difficult for many people.  Lifestyle changes are usually a gradual thing unless there is a major upheaval that forces immediacy.  So my commitment will start with one day, and I will apply it to my entire family.

Here are some things I have come up with:

  1. Use less water.  Don't wash the dishes or do laundry.  Don't shower for the day.  (One day without a shower will not kill you, I promise.)  Be conservative when washing your hands by turning the water off while scrubbing.  (My 4 year old already does this.)
  2. Use less gas.  Take the day off!  But if you can't, carpool.  Don't make extra stops before, during or after work, like driving somewhere to get lunch or going to the grocery store to pick up dinner.  Don't buy gas.  Go in early or late to avoid rush hour traffic.  Take the shorter route and try to avoid traffic lights.
  3. Unplug!  Turn off the television for the day.  Take it a step further and turn off all the paraphernalia that goes with it, too.  No computers.  Less cell phones.  (These require energy when you plug them in, remember, but I wouldn't ask anyone to give up devices that could be for emergencies.)  Turn off the lights, and use candles when it gets dark.

I challenge you to join me in this devotion to a day of conservation.  You don't have to turn off you life to do it.  Pick one thing from the list and commit to it.  Just for a day.  You may find you like who you and your family are without the bonds of modern life and technologies.  Heaven knows my favorite place to be is outside with my family doing things that require nothing but what Mother Earth already provides.  (Except clothes, of course.)


Nature's calling. . . Are you listening?

Saturday, April 19, 2014

Feathered Friday: Herbs for Chickens

As many already know, we had a predator attack the hens and rooster my neighbors left for me.  Evidence left after another attempt proved it to be a raccoon, and it got the rooster and one hen.  Later the next week we lost another hen, but not to a predator.

Front and rear tracks of raccoon
That's been a few weeks past, now.  But this past Sunday, Palm Sunday, I found another egg in one of the nest boxes.  It wasn't the prettiest egg, being pale with textured red-brown speckles, and the shell was thin.  But it was and egg!

First egg after predator attack
After careful observation, and thanks to The Chicken Chick, I was able to determine that the hen leaving me such wonderful presents is Boo-boo.  She is the one that first "told" me something was wrong after the attack because she was limping due to an injury on her leg.

Of the two hens left, Boo-boo is the friendliest and least skittish, which is ironic when you consider the other hen wasn't physically harmed in any way while Boo-boo was.  
Henny & Boo-boo enjoying honey-cinnamon oatmeal
I'll explain in a later post how I know it's Boo-boo leaving me presents, but today I want to tell you why she's leaving me presents.  
Happy hens lay eggs!

I give these girls warm oatmeal with cinnamon and honey mixed in a few times a week.  On top, I sprinkle raw oats.  They love it.

I also give them herbal tea I make myself on a daily basis.  Each batch is different, and I don't measure, but they almost always empty the bowl from the time I put it down in the morning till I pick it up in the evening.  

My purpose today is to give a quick run-down of the herbs I am currently using and the benefits they provide.  Since I don't have fresh herbs growing yet, I'm using dried right now.  I will switch to fresh and add more when they start coming in.
  1. Basil is a natural antibacterial and good for helping to maintain mucus membrane health.
  2. Cinnamon aids respiratory health, including treatment for respiratory issues.
  3. Dill also aids the the health of the respiratory system.  It is also an antioxidant and acts as a sedative or relaxant.
  4. Garlic (fresh crushed cloves) is a parasitic additive, helping to keep the hens free of parasites like worms and mites.  It is also a good additive for reproductive health, otherwise known as egg-laying.
  5. Oregano has antibiotic properties.
  6. Parsley is a vitmin-rich herb also good for reproductive health and the circulatory system development.
  7. Rosemary is another herb good for respiratory health.  It is also a pain reliever and insect repellant.
All of these herbs I use in the tea I make for the chicks and hens.  I just fill my kettle with water, add whatever herbs I want (which is usually a bit of each) and turn it on high.  Once it starts whistling, I turn the heat off, but leave the kettle on the hot burner.  I like to let it steep until it's cool.  When it gets strong, as it will do over the hours, I add water to dilute it.  This method makes the tea last longer.  Once it's cool enough, I pour it into mason jars and store it in the fridge.

The chicks and hens get some every day, and I leave the herb bits in.  They seem to like the extra treats.  

Obviously Boo-boo is appreciative of the treats I've been putting down every day.  Here are the five eggs she's left since last Sunday.  The egg on the far left is the first one she laid.  You can see how they have gotten darker, with more uniform color each day.  They are also gradually getting bigger.


Herbs are Mother Nature's natural solution.

*Note:  I got this information from many different sites, and included the herbs every site listed.

Wednesday, April 16, 2014

Wicked Weather

Over the past week, I've gotten quite a few seeds into pots.  Let me think about it. . . . . . .

  1. Argonaut butternut squash
  2. Italian flat leaf parsley
  3. Garlic chives 
  4. Chives
  5. Boxwood basil
  6. National pickling cucumber
  7. Broccoli
  8. Catnip
  9. Coriander
  10. Green ice lettuce
  11. Leaf lettuce mix
Off the top of my head, I think that's it.  I want to get some German chamomile started, but my seeds are gone so I'll have to find them somewhere.  

Now I know I got an early start on some of those, but I'm hoping for a better crop this year.  More.  That means two plantings.  And a few of them haven't done very well in the past. . .  

  • Last year powdery mildew got almost all of my winter squash.  And I never got feedback from anyone I gave seeds to about the Argonaut, so i don't know if it will produce since it's a hybrid-type.  
  • The garlic chives didn't really grow or me the year I got them.  One plant came up like two months after I planted them, and I harvested and froze it.  I didn't even try last year.  That makes the already questionable seeds two years old now, but I'm giving them one more go.
  • My coriander stank last year.  Literally.  I thought it smelled like stink bugs, so I was reluctant to use it.  But I've never used the herb before so I don't know what I'm missing there.  I did, however, succumb to the temptation of collecting the seeds, so we'll see how they do.
  • The broccoli I bought last year didn't taste very good, either.  I much preferred my neighbor's that he bought at Walmart.  However, I will try my seeds again, along with purchasing plants from my local "stand."
Yesterday brought an ocean of rain to our little slice of the pie.  The water table is already high from all the snow melt and rain, but we got some inches Tuesday.  I don't have an official amount.  I can tell you, though, that my seeds were drowning in their little tubs.  When I got them all out, there was probably about 1.5-2 inches still.  A few hours later it was like I had never emptied them.

To top that all off, we had a freeze warning overnight with possible flurries.  Flurries!  In the middle of April!  This is why I don't plant in my garden until after Mother's Day as a rule.  (Besides, the tilling of my garden is always part of my Mother's Day presents.) The seeds were brought inside where it's warm and dry.  The lettuce containers and the chives (last year's regrowth) are too big, and so are covered in plastic.  

Here's to hoping Spring sticks around the next time she decides to smile upon us.


Show us some sunshine!

Monday, April 14, 2014

Mindful Monday: Homemade Easter Egg Dye

With Easter sneaking up on us next Sunday, I thought it would be nice to forgo the "traditional" tablet dying technique for our dyed Easter eggs.  Since I'm trying to go as all-natural-homemade as I can in my own household, I wanted to add Easter eggs to the "recipe box." (This will be the first year we've done this, and we dye our eggs the day before, so I haven't tried this yet.  I will update after we've done it to give our personal experience with the process.)  

If you search "homemade Easter egg dye recipes" online, you will get something like 162,000 results.  I  looked at a few of these and a couple from chicken sites I trust, and found that most of them are the same.  

You now by now that I'm a farm-fresh egg girl, but the eggs I get are brown.  White eggs really work best for dying--although I'm sure the lighter brown eggs would do fine--so we will be using store-bought eggs for Easter.  

Here's a quick science lesson about egg dye:

  • Vinegar is used to create an acidic environment in order to activate the dye (essentially).  The dyes are acid dyes, and rely on hydrogen bonding which only works in an acidic environment.
  • The warm/hot water (140-180 degrees) also aids in dye absorption.   
So, without further ado, I give you . . . dun-da-da! . . . 

    Homemade Easter Egg Dye!

  1. Use 1 tblsp white vinegar in a coffee cup (or similar sized glass)
  2. Add about 3/4-1 cup warm or hot water  (Hot tap water is fine.)  You want to be sure you can put a hard-boiled egg in the mug without overflow.
  3. Add 7-10 drops of food coloring  (The more drops, the more intense the coloring.  Also, this is where DIY dye can get fun because you can make your own colors.  Most boxes come with red, yellow, blue, and green.  Mix 'em up and create fabulous new colors!  Blue and green will make teal or turquoise.  Red and yellow make orange.  And so on.  Most boxes also have color mixing recipes on the back.)
  4. Place your hardboiled egg into the dye and let it sit until the color is what you want.  (You should also move the egg every so often, or you will get a spot in the color where it sat on the bottom.)
  5. When the desired color has been achieved, remove the egg form the dye, dab on a paper towel and replace it in the egg carton.

A few other tid-bits:

  1. I have read that gel dyes, such as you get from a cake specialty shoppe, or craft store) work better than regular food coloring.
  2. 1 tsp of light cooking oil in the egg dye will give a tie-dye effect.  You can make all of your dyes like this, or you can pick a few.  You can do solid colors then add tie-dyed effects on top, but make sure your first color is dry first.
  3. Splatter your eggs by taking a clean toothbrush dipped in a desired color and using your finger to carefully flick the bristles, creating  paint-splattered effect.  Again, you can do this in a clean white egg or an egg already colored and dried.  (Please don't use a toothbrush someone needs to brush their teeth.)
Personally, I can't wait to try some of these.  I promise to post pictures of our homemade egg-dying adventures after Easter.  Until then, I leave you with a picture of an egg left for me on Palm Sunday by the hen I have come to call "Boo-boo."  

Happy Hens Lay Eggs!


Happy Egg Hunting!

This post is part of a Linky Party!  View the other links here.

Friday, April 11, 2014

Feathered Friday: Grit and Chicken Digestion

Ah, sweet dirt.  It does a chicken good.  (All birds, actually.)

I'm taking about grit the birds use to help digest their food.  It is an essential element to keeping a healthy flock.  Allow me to elaborate.

This is the anatomy of a chicken:
I'm focusing on the white globbies, starting with the crop and ending with the gizzard.

The crop is an expandable pouch used to store food (& grit) for up to twelve hours.  The food (& grit) then moves to the gizzard, but slowly, a little at a time.  

Digestive enzymes are added in the gizzard, which is the muscular part of the digestive tract.  The gizzard uses grit to grind the food into more manageable pieces.

So here we are, back to the all important grit.  Chickens need grit to digest their food, and if they are getting anything other than feed in crumble form, it is vital to their digestive health.  Chicks and chickens who do not have access to dirt in an outside run or by free ranging should have it provided to them.  

There is commercial grit available, but it's easier to offer dirt from your own yard.  It has its health benefits, too.  By placing a clump of dirt with grass or other nummies still intact, the chicks will be exposed to the dirt they will be living on later.  Thus any bacteria or other pathogens may be administered in small doses and help build up the chicks' immunities.

When I put a bowl of fresh grass and dirt into the brooder, the girls go crazy.  They peck at each other and beat their wings trying to be the first to get some of the goodies.  (Below are a few pictures of the girls after a fresh clump was placed.  You'll notice Mine ran to the bowl and stood on it to prevent the others from getting access until she was through.  I think we've found our flock leader.)


Dig that Dirt!

Wednesday, April 9, 2014

Picture Pages

I haven't had time to write due to trying to get our house put back together after almost three months of renovations.  Because of that, today I'm going with the "Wordless Wednesday" theme.  Only I'm not very good at the "wordless" part, so I'm doing "Picture Pages" instead.  (No Bill Cosby.  Sorry.)

Here are two pictures of my son who recently told me he wants to be a farmer and a cowboy.  I was very proud of his proclamation.  I only hope it may be a viable choice for him.  We will always need farmers.  And I don't hold to the song lyrics "Mamas don't let your babies grow up to be cowboys."

My little man loves the work.  Sometimes he grumbles before getting out the door, but as soon as the fresh air hits him he is all go.  He loves the feeding.  He loves the watering.  He even loves the cleaning.  (Just ask our neighbor with the horses.  One time I wanted to visit Dano, the horse, but Bug wouldn't go.  Ms. Kim enticed him over with the promise of an incredibly dirty stall to clean.)

My Bug working hard to get the food for the chickens and kitties back to the barn.


My little cowboy.


Farm on!

Monday, April 7, 2014

Mindful Monday: Repurposing Plastic Food Containers for Starting Seeds

Ah, April.  I now understand the the saying "March winds, April showers. . ." as this has been one wet month.  But it's only day 7, so maybe it will dry up and we'll be able to get out and turn some earth.  Just yesterday I was commenting to Bug about how nice it is that the ground is finally starting to dry out, and we don't sink every time we go to the barn.  C'est la vie.  

I did get a few things done over the weekend, though.  It was a gorgeous weekend, after all.  So, today's mindful topic is reusing empty--and clean--food tubs as seed starting pots.  

There are several benefits to this.  

  1. You are reusing or upcycling, which is part of reduce-reuse-recycle.  And you can recycle when you're through with the tubs.
  2. It saves money on buying seed starting kits.
  3. It saves money on buying plants.  You get more bang for your buck with seeds, and if you are saving your own seeds--as I am--they are free.

Here is my first container, and the star of today's post.  You'll never guess what it held.  ;)

Seeds of all sorts need the soil to be moist but well-drained.  Since the tubs are solid on the bottom, I used a craft knife to cut three small x's in the bottom.
Craft Knife
X in bottom of container
3 X's evenly spaced

I then filled the tub with potting soil.  (There are all kinds of specialty soils out there, but I use a basic potting soil that has moisture beads to help retain the moisture in the container.)  My bag is from last year, so it was a little dry.  I filled it to the top, then pressed down lightly to pack it just a little.  You want your seedlings to be able to push roots through it.  The pressing will also make the sop of the soil slightly lower than the top of the container, keeping water from running over the edge and possible washing out seeds.


Dry potting soil filled to the top

When I added the water, I used rainwater collected in mason jars waiting patiently to cover my peas.  
Rain water in mason jars

My soil was so dry, I actually had to use my finger to poke holes and pour the water in a little at a time. Then I mixed it around a bit, making sure to press it down again when I was sure the soil was thoroughly wetted.
Wet soil pressed down

Then I added my seeds.  I used cherry tomato seeds I saved from my crop last year. This was the first time I saved tomato seeds, so the process, while straightforward, was a bit foreign to me.  (I'll go over this in a later post, but it's not nearly the same as saving seeds from squash or herbs.)  With the way the seeds looked when I opened my little package, I'll be pleasantly surprised if they grow.
Cherry tomato seeds saved from last year's crop
They look nothing like the seeds you see when bite into a juicy fruit, right?  However, when I picked some up and sprinkled them on the soil, I was surprised.  They seemed to change into "normal" seeds.  Go figure. 

Now here is where my seed-planting technique varies from others.  Most people--experts included--will tell you to sprinkle fresh dirt on top of your seeds.  I poke little holes in the soil, drop the seeds in, and use the same soil to cover them.  I tap it lightly so it's packed, but not too tight.  I have never had issues with my method, but do whatever you are comfortable with.  (For lettuce, I just sprinkle the seeds in the container and leave them to their own whims.  It's not how they say to do it, but it works for me.)

I also plant more seeds in the container than they say to do.  While I have personal issues with pulling the weaker plants, I have never had any problems with planting more.  In fact, when I plant 3-4 cucumber seeds in a starter pot, I never pull any of the plants.  I just transplant all of them into the garden, and they thrive. 

Don't forget to label your seeds.  This is very important.  You don't want to mix up the plants later.  I also date them.  This helps me know when I should start seeing some growth, or when I can just call it and plant something else.  I usually give them about three weeks, regardless of what it is.  After having garlic chives come up two months after I planted it, I like to give the slow starters a chance.
Bet you didn't know Kraft makes
Whipped Cherry Tomatoes

You'll need to make sure your seeds and seedlings are kept in a warm place.  I usually just bring mine inside overnight or on colder days.  When it's nice out, I'll put them out in the sun and make sure to keep them moist.  Once they get bigger, I leave them outside and just bring them in when there's a chance of frost.


Please Be Mindful:
Reuse.  Upcycle.  Recycle.

Friday, April 4, 2014

Feathered Friday: Chicks at About 3 Weeks Old

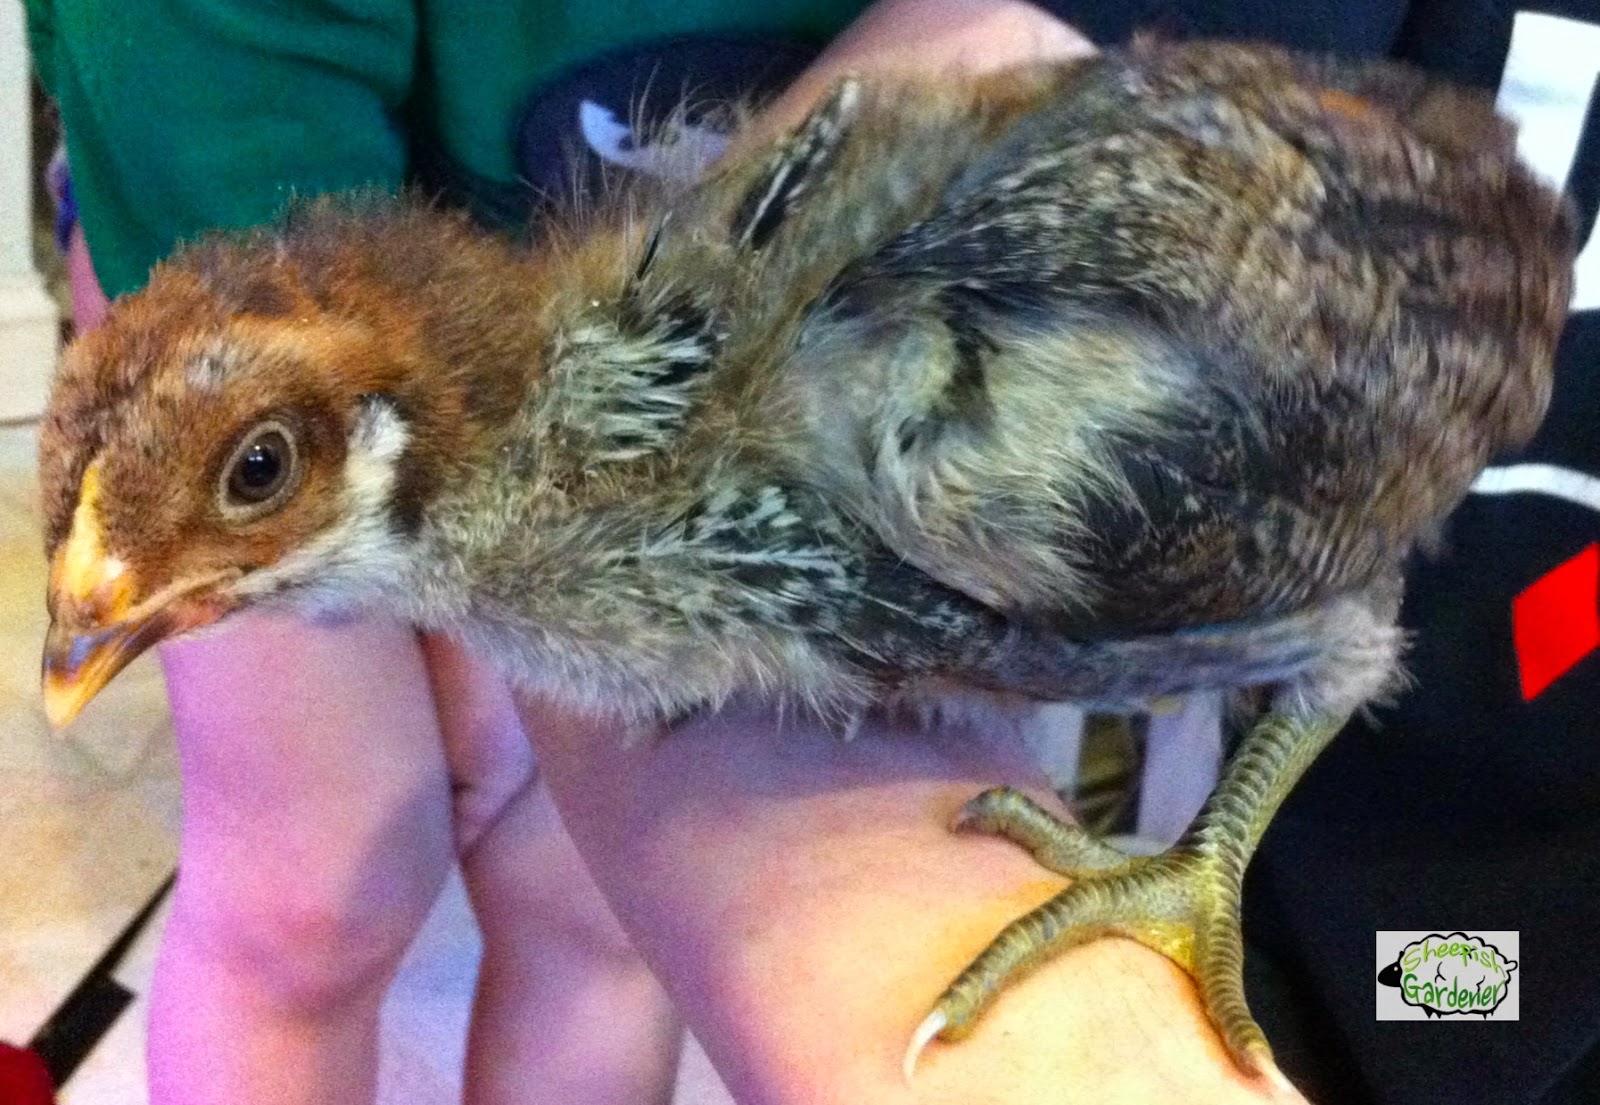
Our little peepers are growing!  Boy are they growing.  Now they are about three weeks old, give or take a few days.  Today I'm going to do a sort of photo journal to show what the girls look like now.  They are definitely not Araucanas as they were labeled, but a mix affectionately called Easter Eggers.  They will still lay blue eggs, and that's what's important to us.


Mine
Bug's chick, Mine, still has her chick coloring on her head, but she is getting some vibrant red feathers on her chest.  Her wings are a brown color with dark and light mottling.


Tommi
Tommy's chick, Tommi, also has her baby markings on her face, but her head has become more red.  Her wings are a more solid brown color, and she has the shortest tail.


Gate Locker
Daddy's chick, Gate Locker, looks a lot like Tommi, but with a much longer tail.  She also lacks the facial markings.  Her entire head is a reddish-brown.


Gracie
Gracie


 My chick, Gracie, was black when we brought her home.  Now she is turing a beautiful chestnut red color.  He wings are showing evidence of "lacing," a color pattern where the feathers' base color is outlined, usually with black.  Gracie's color looks similar to the "Golden Laced Wyandotte."

The chicks are also in their new brooder, a 75-gallon tank.  I am using a ceramic heat bulb I had for my reptiles to warm one end.  I also have a flannel sheet wrapped around that side to trap the heat inside.  You'll notice two waterers in the brooder, as well.  One has the regular water with apple cider vinegar, and the smaller one has herbal tea with the herb pieces still in it.  The chicks love the tea.

New Brooder

 Happy Growing!